Super Easy Bag Pattern
Great beginner sewing project.
This project uses back stitch and whip stitch techniques in three easy seams.
Makes a functional drawstring bag for your small dolls.
Super cute, super easy bag
What you need.
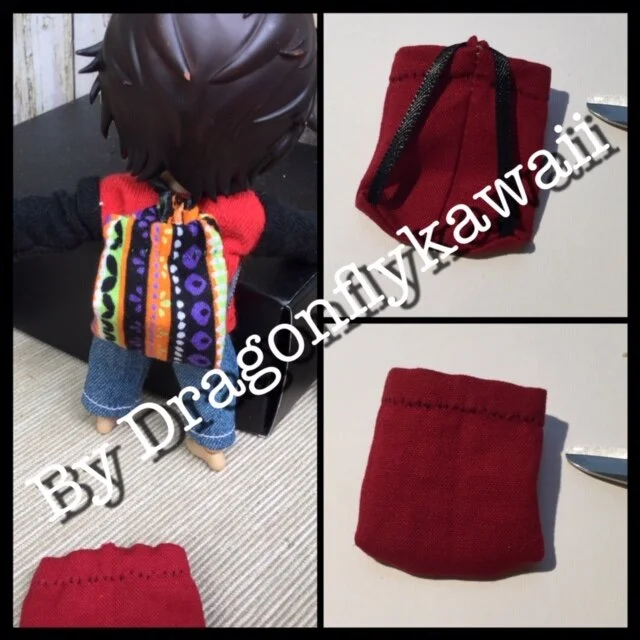
Functional drawstring bag
This is the first pattern of many to come. By joining my email list you will get this pattern with directions for free. You will also get information on how to join a sew-along or view sewing tutorials to help you complete this project, Great beginners or skill builder project, even if you are new to sewing.
Here is a list of the materials you will need to gather before starting:
thread, needle and a couple of pins or sewing clips
iron (though you can fingerpress if you don't have an iron)
scissors and seam ripper
7 inch length of 1/8 inch wide ribbon per bag you want to make
1 piece of cotton fabric cut to 2.5 by 3.5 inch rectangle per bag that you want to make.
Optional: ruler to mark 1/4 inch seam allowances to help keep stitch lines straight.
Optional: reverse grip or locking tweezers. This link is just to show you what I mean, because I didn't know what they were called until making this post, but having a pair of these is awesome because you can grab the ribbon and pull it through to the bottom seam and the tweezers grips the ribbon until you press it open to release it - it is an extra hand!
Prepare and mark fabric.

Not to scale:
Fabric is 2.5inches height and 3.5 inches width
All seam allowances are 1/4inch, so you can mark those on both narrow ends and along one of the wide ends to have every thing ready for the sew along/tutorial launch. Make marking on the wrong (not pretty) side of the fabric. Diagram below is not to scale, but shows fabric and seam lines
Pattern Directions (Rough Script of Sew Along)
Steps for making this bag
Back center seam
1. Fold fabric right side together so the short edges meet. You may want to lightly press the fold to keep the edges together. You may also want to mark ¼ inch (6mm) in at the top and bottom of the side opposite the fold. Draw a sewing line that connects these 2 marks to help with sewing a straight seam.
a. Important note!!! Top vs bottom only matter if your fabric has a directional print (like a smiley face that you want upside right when you turn the bag pretty side out).
2. Starting at the bottom end, sew a seam ¼ inch in from the edge opposite the fold.
3. Stop sewing ½ inch (1.2cm) for the top edge. knot and trim your thread.
4. Where you left the seam unsewn, fold down the fabric diagonally, triangular overlap. Lightly press so they stay in place. This is now the top of your bag
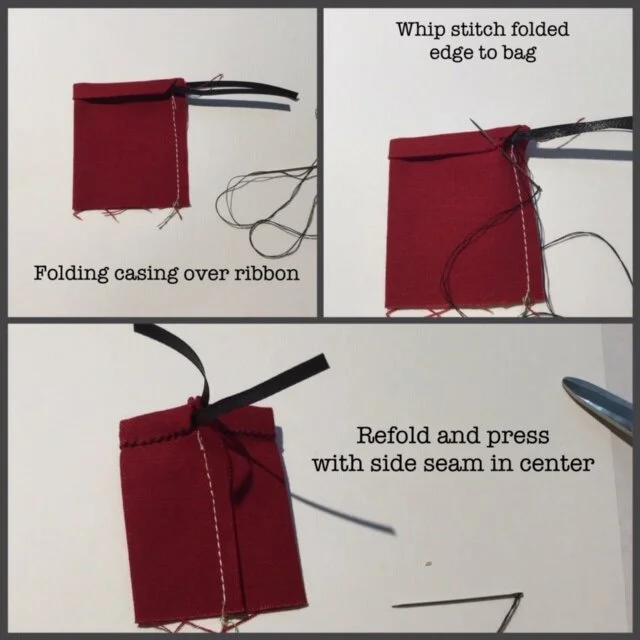
Placing ribbon in fold (Casing)
5. With the bag still wrong side out, fold down the top edge of the tube 3/8 inch (1cm) (so the ribbon would be covered). You can do this either by holding the ribbon at the edge and folding the fabric over the ribbon or by folding first, and then pushing the ribbon under the fold. There should be ribbon sticking out of both ends of the fold.
6. Fold the top edge again, now the ribbon is encased in the fabric. You should be able to gently pull on each end and the ribbon moves – Do not pull too hard, or you will have to refold.
7. Starting at one folded corner, whip stitch the edge of the fold to the bag without catching the ribbon in your stitches. You may want to give the ribbon a gently tug to check that it moves every couple of stitches.
8. Once your casing hem is complete, knot and trim your thread.
Attaching ends of draw strings and the bottom seam.
9. Take the tube and flatten it so that your first seam is in the center of the bag. You may want to lightly press it, so the bag stays in this position and you have creases to each side of the bag. It is at these creases that you are going to align the ribbon as the shoulder straps.
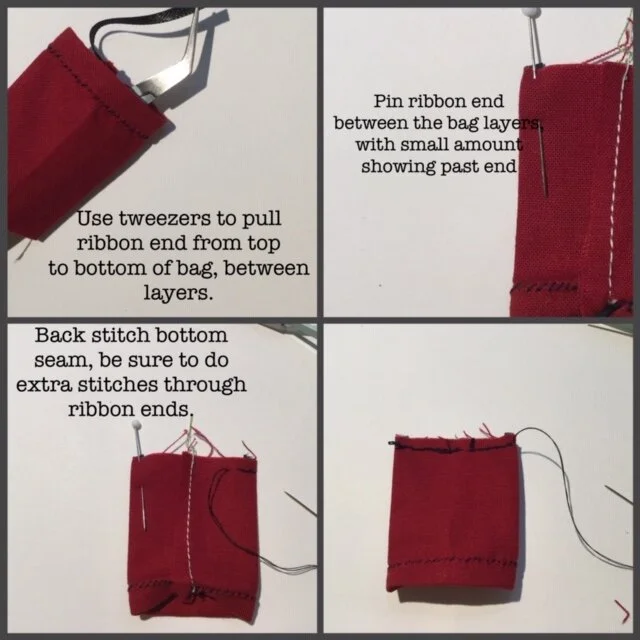
10. One at a time, push the ribbon ends through the top of the bag, so your can pin them between the bottom edge at a crease. The locking grip tweezers is useful here – reach through the open bottom of the bag to grab the ribbon end. Be careful not to twist the ribbons or pull to hard on either end.
11. With knotted thread, sew a couple of stitches to anchor one of the ribbons to the bottom edge of the bag. knot and trim your thread. The other one can also be anchored, but that is the edge that you will start your final seam.
12. Sew a ¼ inch (6mm) seam along the bottom of the bag, making sure to sew several stitches through the ribbon to secure the shoulder straps. Note: before sewing you may also want to mark ¼ inch in at both edges of the bottom and draw a sewing line that connects these 2 marks to help with sewing a straight seam.
13. knot and trim your thread.
14. Turn your back pretty side out and you are finished.
Missing photo of Center seam
Missing photo of triangle fold for edge of cassing, first fold over ribbon