Gradient Dyeing with Glue Resist
Finished two tone gradient dyed fabric
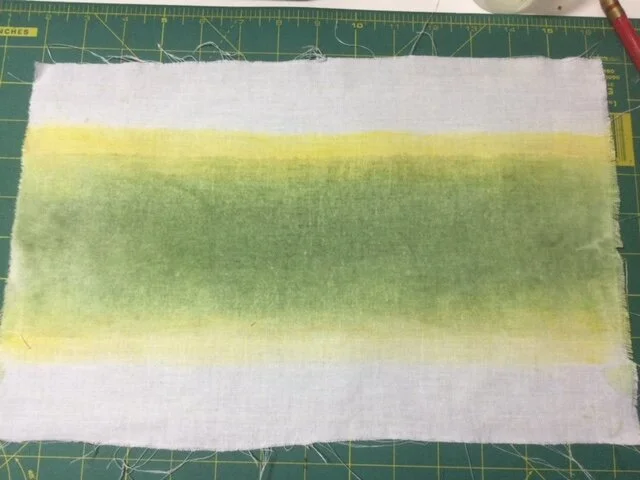
Gradient pattern for character specific garment made with a series of painting steps.
Fabrics with prints and designs scaled to 1:12 size are often easier made then bought. One of my favorite methods is to create gradient dyed fabrics with washable glue, acrylic paints and watercolor techniques
Gradient fabrics are very pretty to work with, but as with most 1:12 scale garments, finding a gradient that repeats within the 2 to 4 inches is just as challenging as finding small scale prints that have repeats within 2 inches (typical 1:1 scale fabric repeat is 8inches). So when you can’t finding, why not make it!
Brief note on resist dyeing: The most common form of resist dyeing is wax batik. In this process melted wax is stamped on the fabric before dyeing the fabric to create the white space in the print. Since the wax is both coating and saturating the fabric fibers where the stamp as applied, the dye can not reach the fibers and change the color. Once the fabric has been dyed, the wax is then removed to return the suppleness of the fabric. The process described below is similar, replacing wax with the washable glue and the dyes with acrylic paints. The dyeing technique is watercolor wash, so the resist is being used to contain the flow of the pigment.
Prep the fabric:
Prewash and dry your piece of 100% cotton cloth, I uses the same bleached cotton muslin that I might back a quilt with. Cut the fabric piece that will be paint large enough to fit all pattern piece with some cutting allowance. A typical 1:12 scale doll kimono requires about 8X8 inch square of fabric. For this demonstration I used a piece that was slightly larger than 8 x 16 since I am making 2 of the same kimonos.
Unlike most fabric dyes, there is not a wet dye setting step. The acrylic paint is heat set to the fabric by ironing after the paint has dried and tumble drying or ironing after soaking and washing to remove the glue. The setting process is repeated after each color is applied if the glue resist must be removed for the purpose of making a multicolor gradient.

Gather other materials: what you will need.
Several paint brushes: one small/narrow brush for glue lines, wide watercolor brush for water wash and another brush for mixing and applying paints.
Clear washable school glue
Acrylic paints – yes, the paint that if applied to the surface of the fabric would form a hard surface. But the steps below thin the paint with water, and it is applied onto water saturated fabric which also spreads the paint into such a thin layer it truly acts as a dye.
Either black or white fabric paint: I use this to create the paint color desired but also because it adds a small amount of fabric paint medium. The medium reduces the stiffness of the fabric (and chances of paint cracking if it is applied in a thick layer). Because I use a watercolor wash process, the paint pigment saturates the fabric and therefore does not add much stiffness nor is it so thick that it coats the surface of the fabric, but a little medium cannot hurt. There are numerous online articles that further discuss whether medium is necessary or not.
Pencil and clear ruler to mark gradient zones for applying the glue. Note: Do not draw lines, just mark the edges to align the ruler as pencil lines will not washout once the paint is applied.
Wax paper and/or Teflon applique mat to keep paint off surfaces when painting and ironing. Note: Do Not iron your fabric on wax paper, it will transfer the wax.

The dyeing process: Between each step the material “painted” onto the fabric must dry. Being impatient myself, I have found that a hairdryer can be used to speed up the drying time.
Step 1: Create the resist:

Measure and mark the location for the first gradient dyeing section on to your fabric. Apply a line of clear glue just below the line that would mark the end of this color. Using a up and down motion spread this glue line, so the glue saturates the fabric – this is the resist, so you want a thick, consistent line to block the flow of your paint pigment in the next step. The white fabric should become translucent when the glue has seeped through the cloth. Once the resist area is saturated, any excess glue can be spread over the area to form a uniform cover. Repeat this process if the gradient area has a top border. Let the glue dry.

Step 2: Painting your dye:
If you need to mix your acrylic paints for the shades you want to dye, do that now. In the mixing process add a few drops of the fabric paint into the mix to add some medium to your final paint color.

Prep the fabric to be painted with a layer of water: Between the edges of the gradient area, use the large watercolor brush and apply water to saturate the area to dye – Watercolor wash or a wet-on-wet technique.
Since gradients shift in intensity, begin applying the acrylic paint to the saturated fabric where you want the most intense shade of the color you are using. Use an up and down stroke motion to work the paint across the saturated fabric. Alternately, pick up a brush full of water to continue to push the pigment from the area of intensity out towards the edges. The dyeing process relies on saturating the fabric with pigment to create the dyeing affect, not coating the surface with paint, so use both paint and water to move the pigment through the cloth. Once done painting the first color, hang the fabric to dry and clean off the wax paper or Teflon mat to get ready for the next painting round. By not letting fabric dry on the surface you painted it on, you are also reducing to likelihood that the fabric will become stiff, since the pigments in the cloth will dry, but not the puddled material left on the surface.

Step 3: Heat setting, washing and heat setting again.
Heat set #1: I always iron the dry fabric before washing out the glue to help ensure the paint will stay. I do this as a slow press across the fabric, keeping the iron in one place for a count of 3 before moving. Usually, I do this on both the front and back of the fabric for good measure.
Washing: Next in warm water and with a gentle soap, soak the fabric for 5 to 10 minutes to dissolve the glue. After soaking, gently rub the glue lines to make sure that the glue has been fully removed. Rinse and inspect the glue line area, there should be no whitish stains – if you see this, the glue is still present, and your need to soak the fabric longer.

Heat set #2: Once glue has been removed, rinse and wring out the fabric. Dry in a dryer or by pressing with an iron. Cloth should press flat. If there is any puckering, there is still glue in the fabric, and you need to soak the fabric longer. It is important to remove all the glue, as any remaining glue will resist any further dyeing steps.
Once the fabric is fully heat dried it is ready for either more dyeing or for use. To do more dyeing, just follow the 3 steps above as many times to complete your print.